The Creative Cloud features Adobe’s designers can’t live without
From well-known to undiscovered, the indispensable tools in our professional apps

We reached out to the talented members of Adobe Design to discover which Creative Cloud tools and features they rely on most. From the tone- and mood-shaping power of Color Grading in Adobe Lightroom, to the niche utility of Math Expressions in Adobe InDesign, these are the indispensable Creative Cloud tools our team can't imagine being without.
Adobe InDesign Auto Style, a go-to design hack
Aditya Bansal, Experience Designer, Adobe InDesign

“In general, I love how styles are applied in Adobe InDesign but when I first discovered Auto Style it was a lifesaver. Back in college, I used to design a lot of magazines and posters for different college fests and society events. Each had its own vibe, but we still had to maintain a consistent design language across our materials—posters, schedules, social media posts.
“Instead of manually applying styles to headings, subheads, and body text, Auto Style picks up on the formatting and applies the right styles automatically. It saved me so much time and helped keep everything uniform, which was super important when juggling multiple events.
“Even now, when I create personal projects like magazines or brochures, I still rely on it. I can paste in raw text from Microsoft Word and let Auto Style do the heavy lifting—it’s a small thing, but it makes a big difference in my workflow. It handles the repetitive stuff so I can focus more on the actual design.”
Adobe Illustrator Live Corners, core functionality in a vector-editing toolkit
Gabriel Campbell, Principal Designer, Adobe Illustrator

“Live Corners in Adobe Illustrator gives users fluid, non-destructive control over corner radii in vector paths. Whether someone’s working with rectangles, complex polygons, or custom shapes, this feature allows them to round, invert, or chamfer corners dynamically, right from the canvas or the Transform panel.
“It’s a core part of Illustrator’s vector-editing toolkit. For workflows involving UI design, branding, iconography, and typography, the ability to fine-tune corner radii with accuracy and speed is critical. It supports iterative design by enabling real-time adjustments without altering the underlying path structure. It also enhances visual consistency, saves time, and reduces the need for redundant shape redrawing or manual smoothing. It even has a few lesser-known uses like smoothing traced artwork (applying Live Corners to vectorized images can help soften jagged paths, improving overall clarity) and creating organic shapes (rounding corners on irregular polygons can yield soft, blob-like forms perfect for playful illustrations or abstract elements).”
Adobe Photoshop Blend modes, a way to discover hidden worlds
Prachi Chaudhari, Staff Designer, Adobe Photoshop

“Among Photoshop’s features, Blend modes are my favorite. Though they may seem simple, they open countless creative possibilities. In Photoshop’s layer-based system, true magic happens when layers interact. Blend modes enable this interaction, revealing colors and details often unnoticed in a single image. They determine how the pixels of one layer blend with those of the layers beneath, allowing for endless visual experimentation.
“The beauty of Blend modes lies in their unpredictability, you never quite know what will happen when you combine layers. Each blending experiment unveils something new, transforming the way I perceive and work with my images. For me, Blend modes represent Photoshop and creativity at their most experimental, a perfect fusion of artistry and software, where creativity thrives through unexpected discoveries.
“By combining Blend modes with color adjustments, I transform my photos of succulents into surreal, iridescent visions, revealing hidden colors and textures that feel like glimpses into the secret lives of plants. A strange, cyber-organic world emerges when nature collides with digital experimentation. In chasing these unexpected, mutant-like hues through Blend modes, I’ve discovered not just a palette, but a visual language that now defines my style.”
Adobe InDesign Math Expressions, a powerful feature for a niche audience
Saptarshi Das, Senior Experience Designer, Adobe InDesign


“Math Expressions may have a niche audience but it’s a valuable InDesign feature—that’s becoming more powerful with every release. It streamlines the creation of mathematical equations (expressions) by allowing them to be created on InDesign’s canvas and anchored directly in text frames that easily adapt to layout changes.
“Creating math expressions for textbooks traditionally required multiple steps, scripting knowledge, and switching between apps while working on layouts—which was particularly disruptive for scientific publications requiring many mathematical or chemical representations. Math Expressions eliminates the need for supplemental software. Complex equations like binomials, integrals, and summations can be created without coding, using categorized grouped expressions, and symbols from the Math Expressions panel, keyboard input and placeholders, while the Mathematical Markup Language (MathML) is auto generated in the background.”
Adobe Lightroom Color Grading, tone shifts that bring photography to life
Gabriela Iancu-Mihai, Senior Visual Content Designer, Product Engagement Design
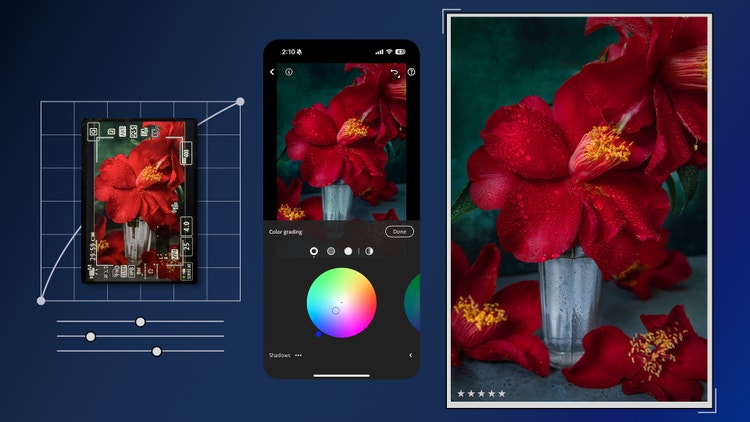
“As an artist, the Color Grading scopes in Adobe Lightroom are among my favorite creative tools. I use them to soften and color correct, but also to create color treatments for my photography. They’re how I bring emotion and atmosphere into my work. I’m inspired by the drama and richness of the Baroque period, where light and shadow tell stories as powerfully as the subjects. With the scopes, I can tap into that same energy, shaping tone and mood in a way that feels intentional and expressive.
“A panel with color wheels makes it super easy to adjust colors by moving sliders or points to get to the colors you’re looking for. It’s amazing how even small tone shifts can completely change the vibe of an image. A slightly cooler midtone can add a hint of mystery or moodiness, while warmer highlights instantly make things feel inviting and close.
“Color grading is an essential step for me now... it’s where the image really starts to come alive. I usually cool down shadows with soft blue tones, then warm up the midtones and highlights with red-orange hues. That balance of complementary colors adds a visual tension that helps the image feel grounded but also cinematic, like it belongs to a different world.”
Adobe Premiere Pro Text-Based Editing, easing the video editing process
Jessica Outlaw, Senior Staff Experience Researcher, Creative Product Group
![The Adobe Premiere Pro interface shows a person with red hair wearing headphones and holding a spray paint can. An overlay of text on the left side of the image is a timestamped audio transcript with highlighted "filler" words. The transcript includes: 00:28:07 - 00:42:17 I saw someone painting a mural for the first time, and it was just the coolest thing I’ve ever seen. 00:42:19 - 00:51:09 [filler] I was like, I want to do that. [filler] And that person actually sort of [filler] took me under his wing and taught me.](./media_1aa27c5be0932effc348a15236a20ab03f501893a.jpg?width=750&format=jpg&optimize=medium)
The Adobe Premiere Pro interface shows a person with red hair wearing headphones and holding a spray paint can. An overlay of text on the left side of the image is a timestamped audio transcript with highlighted "filler" words. The transcript includes:
00:28:07 - 00:42:17
I saw someone painting a mural for the first time, and it was just the coolest thing I’ve ever seen.
00:42:19 - 00:51:09
[filler] I was like, I want to do that. [filler] And that person actually sort of [filler] took me under his wing and taught me.
“As a researcher, I’m obsessed with Adobe Premiere Pro Text-Based Editing. It was my gateway to learning Premiere Pro when I first joined Adobe, and it continues to be helpful for grabbing multiple quotes across research sessions.
“I create video clips of customer interviews to highlight needs and pain points to share with Adobe’s product teams, and Text-Based Editing has transformed that video editing experience from stressful to easeful. Previously, making these clips required intense focus and I’d often postpone the task until the end of a research project—resulting in stress and rushed edits. With Text-Based Editing I can easily underscore key ideas from user interviews and use automations to instantly remove pauses and filler words like “um” and “like.”
“It’s an invaluable asset for user research. It helps me connect product teams with the needs of creative professionals, which translates to better products for all of Adobe’s customers.”
Adobe Express GIF to MP4 converter, a simple path to versatile animations
Alex Rojo, Experience Designer, Adobe Photoshop

“In my personal practice, I design mini, analog, mixed-media artworks that explore the tactile, layered nature of the craft. I rely on Adobe Photoshop’s frame-based timeline to build simple animations that lean on the additive and subtractive process, but my GIFs become much more versatile when I upload them to Adobe Express then export them as MP4s, and not just because I can easily customize them with audio, text, and background effects, and extend the original length.
“Most recently, I created a video commemorating three years of creating and sharing work online. I compiled a few of my favorite pieces and masked elements of the collages to reveal the artworks underneath. Once done, I imported it into Adobe Express to convert it into an MP4, which made it easy to post on social media. It felt like both a celebration of process and a reflection of my aesthetic growth over time.”
Adobe After Effects Motion Blur, adding more realistic movement to animation
Dave Werner, Senior Staff Designer, Digital Video & Audio

"If you wave your hand rapidly in front of your face, you’ll notice it doesn’t stay in one consistent state. To our eyes, faster motion naturally blurs. So, when you animate a title, logo, or character without this kind of blurring that we see in everyday life, it can often feel cheap and unbelievable.
“When an “Intro to Adobe After Effects” instructor told us to click the ball icon to automatically add Motion Blur to any layer, my world was forever changed. All my animations instantly felt more polished and professional (if only all tools were so easy). Now for every camera pan, character movement, logo reveal, and title sequence, Motion Blur helps my stories come alive.
“After Effects has always felt like the ultimate playground where all my work—from Adobe Fresco to Adobe Character Animator—can interact and play. Motion Blur helps all the disparate parts feel like they’re part of one coherent world. Even as a designer, I sneak After Effects animations into my designs and prototypes because the blur makes every cursor drag and image zoom look so good.”